How to Upload a Powtoon Video to Seesaw
Welcome to the eighth footstep in our complimentary self-paced formtoaid you set up your ain personal or professional person educator web log!
The aim of this step is to:
- Share some free tools for creating videos online
- Explain some unlike methods for creating videos offline
- Explain the copyright implications of using videos
- Provide an overview of different video hosting websites
- Teach you how to embed videos into your blog posts and pages
Back to Top
Why Utilize Video?
Traditionally, blog posts were all about text and images. However, videos tin can really bring your blog alive and make the company experience more engaging and interactive.
Below is an overview of some tools you tin apply to create your own videos, along with examples and tutorials. Nosotros also offer guidance on using videos created by others.
Dorsum to Top
Online Video Creation
Making your own videos is easier than always! There are online options that are:
- complimentary/paid
- simple/complex
- for editing/creating
- for all ages/restricted to over thirteen or eighteen
- designed for video footage/images/blitheness
Here are a few options for creating dissimilar sorts of videos using online tools. Feel free to share your own ideas too!
Screencasting (Loom)
Screencasting is where you narrate a video recording of your computer screen. Sometimes it's just sound and sometimes you can see your face in the video likewise.
One free tool that you may find particularly useful is Loom. Check out this blog post about Loom by Kathleen Morris if you want to acquire more than.
For a very simple case, you could narrate a Google Slide presentation as per the case beneath made for our Amend Blogging With Students course.
Back to Height
Brand Your Post Into A Video (Lumen5)
This promo video for our Amend Blogging With Students form was made with a costless online tool called Lumen5.
It'due south a elementary way to make a slideshow blazon video.
Information technology can even "automagically" make your blog postal service into a video (for best results yous'll demand to edit information technology slightly).
Lumen5 contains a library of Creative Commons Zero images and music so you don't demand to search for content either (although you can use your own pictures and video).
You can't embed your video directly onto your blog currently. So you accept to put information technology on social media or YouTube get-go so get the embed code from there. Or you could download the video and upload it direct into your post/page.
Back to Elevation
Animation (PowToon or Biteable)
There are a number of ways you can create simple animations online. Two costless tools you might exist interested in exploring with your students includePowToon and Biteable.
Both of these tools accept gratis plans and can be used by students under 13, yet, they exercise crave students to sign upward via email. I contacted both companies to confirm the historic period restrictions. PowToon recommended supervision or using a paid classroom business relationship (obviously, supervision is ever a good idea!)
One benefit of PowToon over Biteable is that you can download your finished production as a PowerPoint or PDF file. You can only download your Biteable creation with a paid plan.
Yous can embed both tools into your blog posts or pages.
PowToon Instance
This is a video a student made for the Student Blogging Challenge about quality commenting.
Biteable Example
Another pupil taking part in the challenge created this Biteable about YAPPY.
What is YAPPY? on Biteable.
Back to Top
Offline Video Creation
You can make videos in the traditional way too. You don't need any fancy equipment either — a phone, tablet, or webcam can work just fine!
Here are three ideas that might work for your blog posts.
Piece To Camera
I know, I know… who likes getting in front of a camera? Almost teachers would avoid it at all costs! Merely it is really a dandy way to connect with your readers.
Here is an example Linda Yollis made to welcome her new students to the classroom.
Get creative with a dark-green screen!
Cheque out this video from Tony Vincent who made a welcome back video for his students. Tony used green screen technology to make the clever groundwork!
Want to learn more virtually dark-green screens?
- Tony Vincent has compiled some dissimilar green screen set ups.
- LitFilmFest has shared 7 tips for using a greenish screen in the classroom.
- Jonathan Wylie has compiled dark-green screen tips from teachers on Twitter.
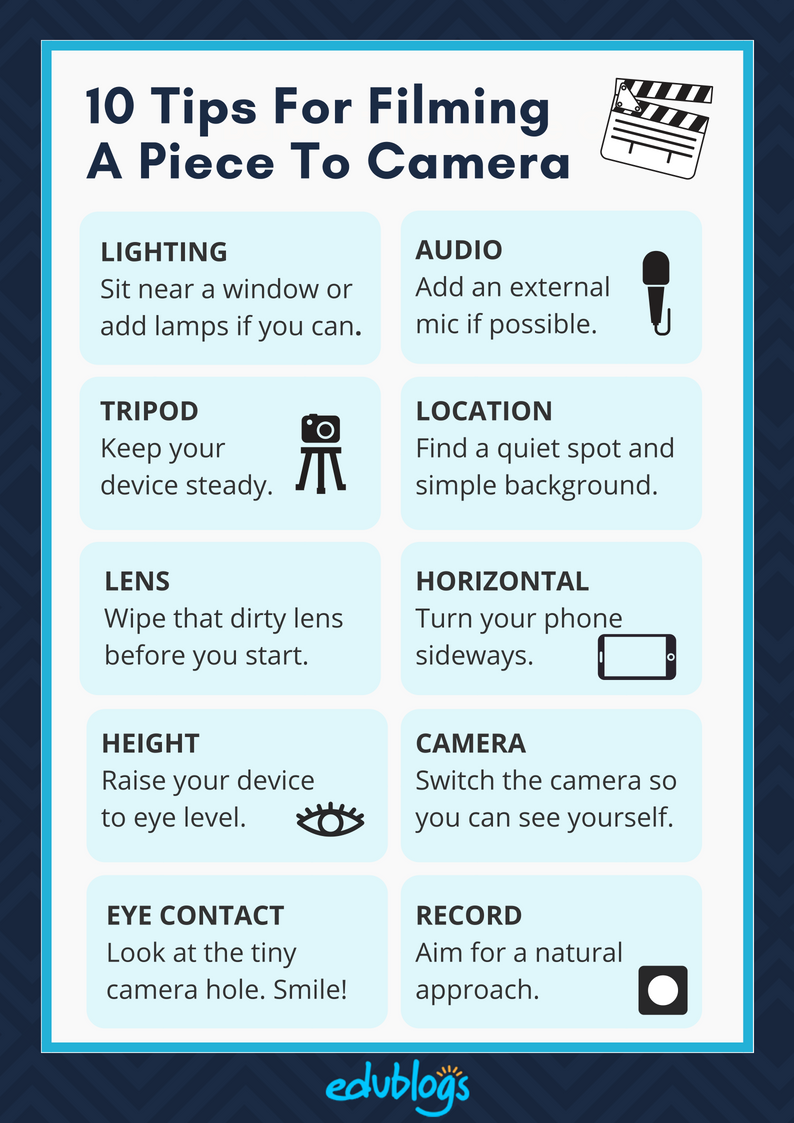
10 Filming Tips
There are a few things you can do to heighten the quality of your slice to camera.
- Lighting: This is really important! Sit near a window if yous tin can or add lamps etc. Aim for even natural light. Don't have a window behind you.
- Audio: Your phone or computer volition record video just fine (in good lighting) but the audio quality won't exist great. Add an external microphone if possible.
- Tripod: If yous're using a telephone, it needs to be steady. Many discount stores now sell basic phone tripods. You lot can drag these on article of furniture equally needed.
- Location: Keep your background simple and movie in a placidity location (easier said than washed at school?).
- Clean your lens: Especially if you're filming on your phone, wipe that dirty lens.
- Horizontal: If you're using a telephone, plough it on its side. If you want to know why your video should be horizontal, you might enjoy this very funny video.
- Enhance your device: If you're using a laptop to film, yous might want to heighten it so you're at heart level. Same with a phone or tablet.
- Front facing camera: If yous're lonely, switch the camera and then you lot tin can run into where you are in the frame (consider positioning yourself slightly off center in the frame).
- Expect at the lens: Discover the tiny hole and try to make eye contact with it. Grin!
- Record: Whether or not you want to actually script what you want to say is upwards to you. A more natural approach may be to create a few notes or an outline, rather than scripting or reading. Pace yourself and savor!
Want to share these tips with your students or colleagues? Download the PDF.
Back to acme
Film Your Lesson
Have you e'er thought about recording your lessons and publishing them, non only for your own form, just for anyone who wants to sentry and learn?
Eddie Woo is a Sydney maths teacher who has done just that.
Eddie'south award winning work has earned him a huge following with students from beyond the globe.
Eddie has a YouTube channel and houses his videos on his blog too.
Here is an instance…
Back to elevation
Every bit yous tin can meet, information technology'southward nothing fancy but it works!
Of course, students can "be the instructor" too and record tutorials for other students.
A Notation On Editing Software
Most people know how to record a video. Information technology tin can be as elementary as opening the camera function on your telephone and hitting record.
But then what do you do with your raw video?
It'due south non always essential, merely y'all'll generally want to exercise some basic editing. This can include things like:
- Adding text titles or captions
- Calculation music
- Chopping out certain parts of the video
- Mixing together video and images
If y'all use a Mac estimator, the go-to program is generally iMovie. You lot tin also use the iMovie app on your iPhone or iPad if yous have i.
It's a little more than complicated on a Windows computer. Windows Moving picture Maker used to exist a popular choice for simple editing only it has been discontinued now.
If you are not a complete beginner with video editing, you might want to cheque out a free plan called Shotcut. This tutorial video by Teacher's Tech shows you lot how to get started.
Let the states know your option of video editor in a comment!
Copyright And Videos
Video is more than confusing than images because y'all come across a lot of remixed videos online or videos using commercial music, especially on YouTube.
You are complimentary to embed whatever video from YouTube, Vimeo, BlipTV, WatchKnowLearn, etc. on your blog or website as long as it gives you lot the embed option.
That being said, you can't necessarily utilise parts from videos on YouTube (or other sources) to make mashups or every bit part of another video.
If yous utilize any video that y'all are cut, making changes to, or adding to a projection, or adding audio, it is better to:
- use Creative Commons content, or
- utilise free or public domain content, or
- request permission from the copyright holder
You can read more than nigh Artistic Commons and free or public domain content here. Refer to The Educator'due south Guide to Copyright, Fair Utilize, and Creative Commons for comprehensive information on the employ of images, curriculum docs, text and quotes, music, videos.
Lookout this video on Creative Commons for a elementary explanation.
Dorsum to Top
YouTube Copyright Nuts
If you do utilise copyright content on YouTube this is what might happen:
- The video and/or audio is pulled because of a DMCA complaint, copyright infringement, or content ID friction match.
- No action is taken but they might add together an advertisement to your video that says 'Buy this song'.
The following videos are good for explaining video copyright to younger students.
- YouTube Copyright school video
- YouTube Copyright Basics
Back to Tiptop
Video hosting websites
Videos from video hosting websites such as YouTube, Vimeo, Media Core, SchoolTube, and Google Drive can be easily embedded into posts or pages.
This is handy when you:
- have big video files y'all want to add together to your blog posts
- desire to play your video within an embedded player, or
- desire to embed a video created by someone else into your posts.
Back to Tiptop
YouTube
YouTube is the almost popular video sharing and viewing website. Information technology has over one billion users which is around ane-third of all people on the cyberspace.
While some schools cake YouTube, there are lots of educators who apply YouTube to share videos they or their students take created. Teachers as well use YouTube to source video resources to use in the classroom or for their professional person do.
We recommend you set up upwards a class or teacher YouTube account if you plan to upload videos or create YouTube Playlists because this helps divide your work videos from your personal videos.
YouTube Playlists are a fantastic manner of compiling a list, or grouping, of videos that play in order to share with students. When one video finishes playing the next video starts. Using YouTube playlists, you can control the start and end times of each video — this is handy if y'all want students to watch specific parts of videos.
Picket this video tutorial to learn how to create YouTube Playlists.
Back to Top
Vimeo
Vimeo is another popular video sharing and viewing website. Fewer videos are hosted on Vimeo compared to YouTube. Vimeo is less probable to exist blocked in schools compared to YouTube which is why information technology'due south a pop video hosting website for uploading videos for class and for finding videos to apply in class.
Back to Top
Google Drive
Google Drive allows yous upload video files up to ten GB in size on your desktop figurer or using the Google Drive app on your mobile device. You tin and then share them with select people or embed them into posts and websites.
Google Drive is a pop video hosting option for schools using Google Apps for instruction. Many of our Google Apps for educational activity schools upload their videos to Google Drive and utilize the embed lawmaking to add to their posts.
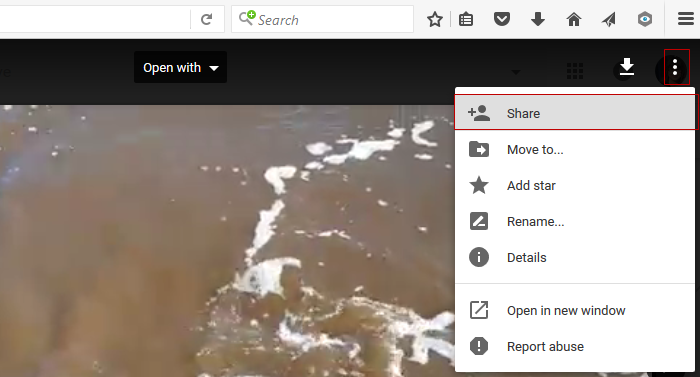
Once you've uploaded your video to Google Drive you need to:
one. Click on the video or photograph you want to embed and then click on the More icon and select Share.
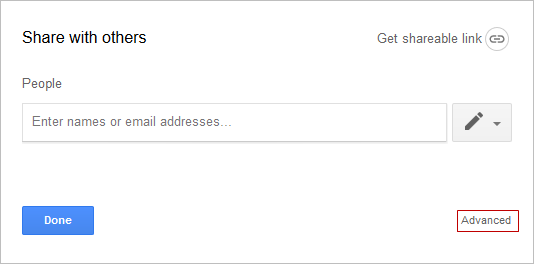
2. Click on Advanced option in Share window.
3. Click on Modify adjacent to Individual.
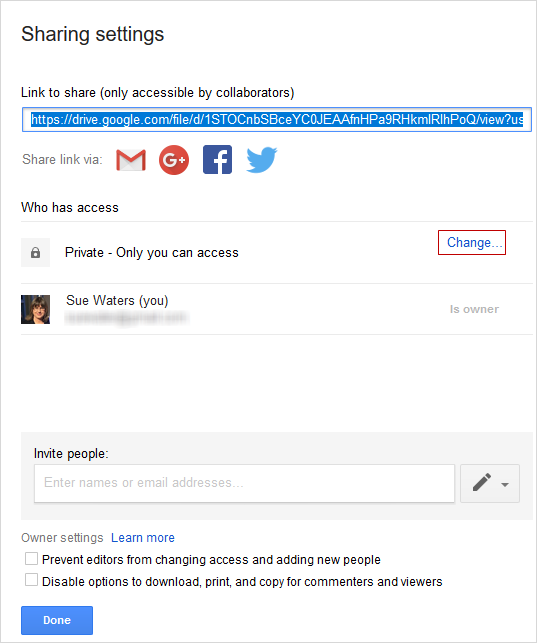
4. Click on On – Anyone with a link or On – Public on the web and and so click on Salve.
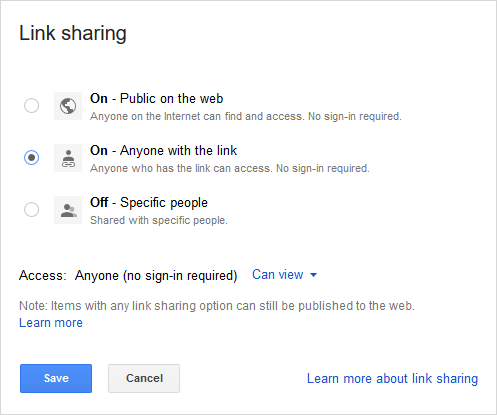
v. Click on Washed to shut the Share window.
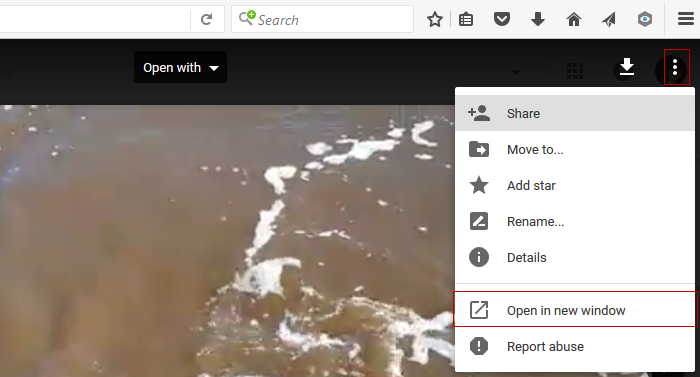
6. Click on the More icon then Open up in new window link.
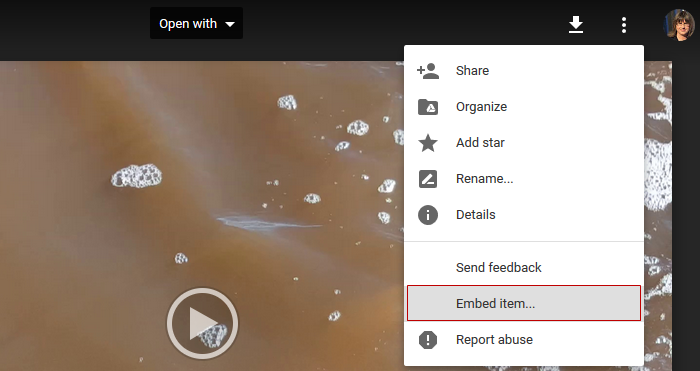
7. Click on the More than icon in the new window and select Embed item.
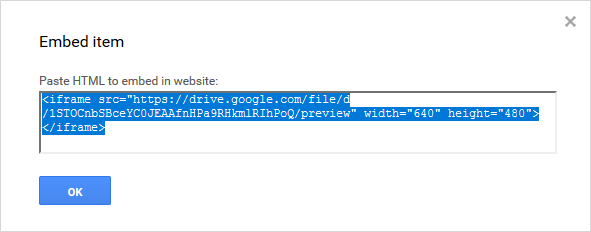
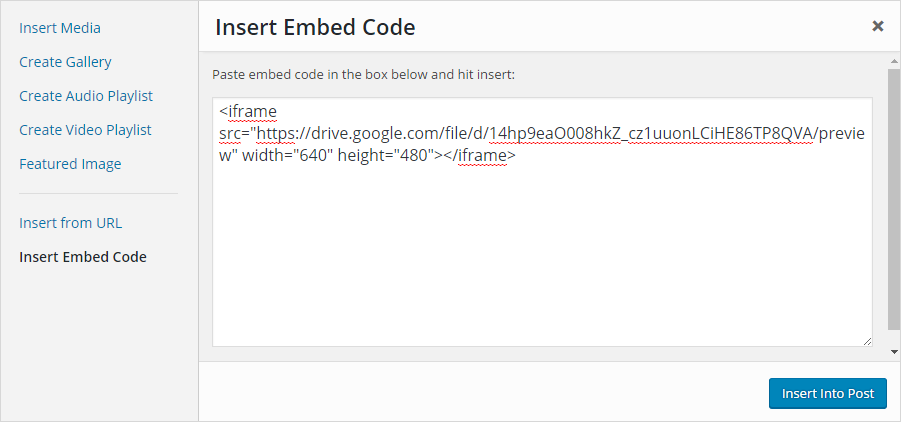
8. Re-create the embed code.
9. Paste the embed code into your post using Insert Embed in the Add Media Window and and then click Insert into Post.
10. One time your post is published y'all'll come across your photograph or video embedded.
Back to Top
Embedding videos into posts
Videos from video sharing websites tin be embedded into posts or pages by either using:
- Their video URL
- Their embed code
(Note: embed code is non allowed on Edublogs gratuitous blogs due to misuse by spammers).
Using the Video URL
Edublogs allows you to chop-chop embed videos, images and other content such as Tweets and Scribd into a post or page using their URL.
Websites that you tin can embed using their URL are:
- blip.tv
- DailyMotion
- Flickr – videos and images
- Photobucket
- Qik
- Scribd
- Viddler
- Vimeo
- YouTube – public videos only
- WordPress.goggle box
Y'all embed a video using the URL as follows:
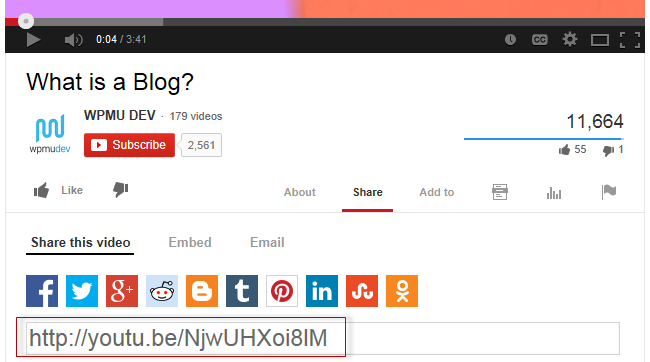
1. Copy the video's URL from your web browser's address bar while viewing the video.
- For YouTube videos, y'all need to use the video URL listed in Share this video.
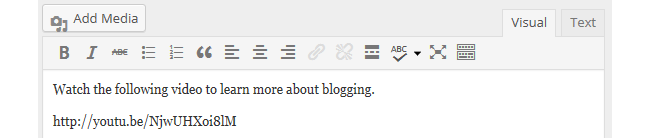
2. Go to Posts > Add together New or Pages > Add New or open an existing post or page in editing mode.
3. Paste the URL on a line by itself in your post/page editor.
Important URL Embed Tips
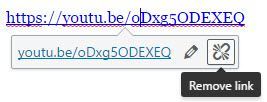
The link must exist on its own line without whatsoever characters or white spaces before or after the URL. It must not be hyperlinked otherwise it won't embed.
You lot can tell if a URL is hyperlinked by clicking on the link. If the hyperlink button in the toolbar highlights and a link box with the option to edit appears (like in the screenshot below), it means your link is hyperlinked.
Click on Remove link icon to remove the hyperlink.
Back to Superlative
Using Embed Code
You lot tin can besides embed videos using their embed code if you have an Edublogs Pro or CampusPress web log.
This is handy when you want to change the size of the video embed, remove related videos when embedding YouTube videos, or are embedding from a video sharing websites where you can't employ the video URL (e.yard. TED Talks, SchoolTube or TeacherTube).
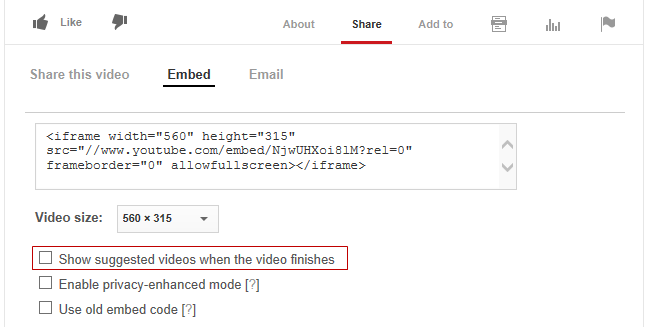
Here is how you remove suggested videos in YouTube using embed code:
1. Click on Share underneath the YouTube video you desire to embed.
2. Click on Embed and and then on Testify More.
three. Deselect Prove suggested videos when the video finishes.
4. Copy the embed code.
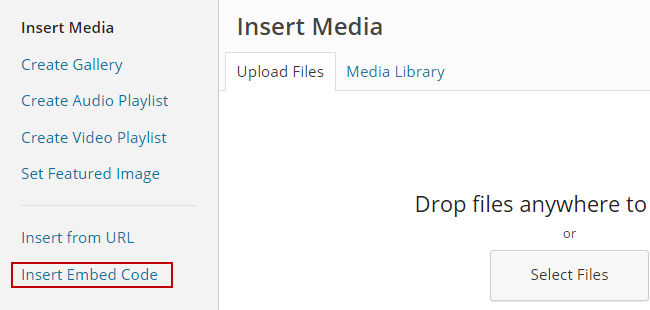
5. Go toPosts > Add NeworPages > Add New.
6. Place your cursor where you lot desire the video to appear and so click on the Add Mediabutton.

vii. In the Add Media window click on theInsert Embed Code tab.
8. Paste the video embed lawmaking into the embed lawmaking field.
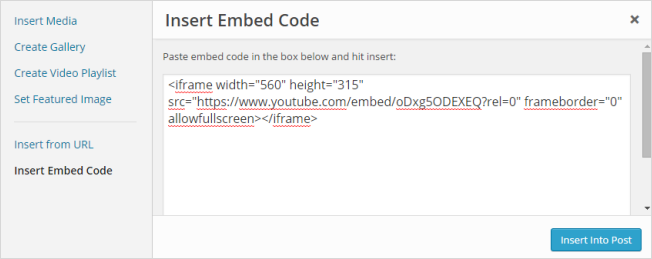
9. Click onInsert into Post.
ten. YourAdd Media window will close and the embed will announced in the visual editor equally shown below.
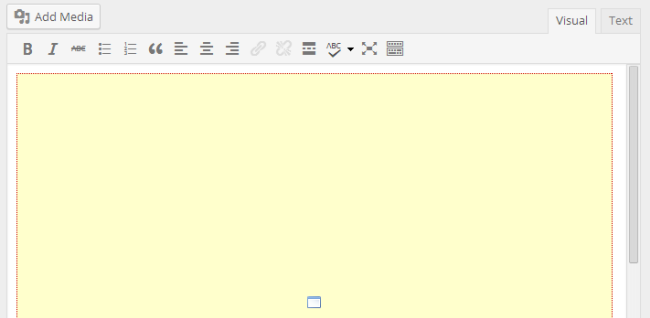
11. When yous view your published mail you will run into your video.
Back to Meridian
Your Task
We'd similar you lot to add together your voice and ideas to our ongoing conversation nigh blogging by undertakingane or more of these challenges:
- Share a video: Discover a video on a site like YouTube or Vimeo that you would like to share and embed it into a blog post. If y'all take a gratuitous blog, utilise the URL method that was explained in the post. Then go out a comment with your weblog URL so we tin take a look.
- Try a tool: Choose one or more than of the video creation tools mentioned and try using the tool yourself (or with your students). Leave a comment with a link to where yous've embedded the video and so we can check out how you went.
- Exist brave! Make a short slice to photographic camera and embed it in a weblog post (or upload it to a site like YouTube and share the link with u.s.).
- Other tool suggestions: Leave a annotate with a description of some other tools yous've come across to create or edit videos. Tell us how you've used video in the classroom before, or how you employ video equally part of your professional person exercise.
Also feel free to leave any questions you are having (or tips/advice) as well.
How to leave a comment: Scroll down to find the comment box. Write your comment, and so enter your name and email address (electronic mail addresses are not published). Enter the anti-spam discussion. Press submit and we volition moderate your annotate ASAP.
Source: https://teacherchallenge.edublogs.org/step-8-video/comment-page-1/
0 Response to "How to Upload a Powtoon Video to Seesaw"
Post a Comment